Sorry I've neglected my blog, I've been too busy living in the pub.
It seems that whenever I want to write about something I leave it so long I forget what it was I wanted to write. I'll do a proper update tomorrow!
------------------------------------------------------------------------------------------------
The original intent of this entry is to provide a tutorial on how to henna dreadlocks. I have never used henna before and I couldn't find a clear tutorial for Lush henna hair dye's [you can follow this tutorial even if you don't have dreads it follows the same steps].
My hair was a horrid mess of bleach, brown and red dye and because I'd dyed it too much, too often it was suffering.
I haven't dyed my hair in a year and a half and I really didn't want to use chemicals ever again so I figured henna would be the best way to give myself a new colour.
I decided to use Caca Brun. Scroll right down if you don't want to read the next bit to the the tutorial. Results will vary from person to person and I will not be held accountable if you followed my tutorial and you had less than desired effects.
-----------------------------------------------------------------------------------------------
Now before I start some people say that Lush's hennas should not be used on dreadlocks because of the high level of cocoa butter in them, which makes it a solid bar, as it is 'impossible' to wash out the tiny lumps of henna.
But I have had my dreads for 2 1/2 years [no wax] and I found it incredibly easy to wash out but then again, my locks are impenetrable.
So maybe if you have had your dreads for less than a year and you have money to burn, then maybe think about using the stuff at your local health market.
Lush sells their henna for £7.10 I didn't realise, until they came in the mail, just how big the blocks would be so I ordered two online.
Even at £14.20 this was still a saving of over £10 if I were to buy the required three boxes of chemical dyes [even boxes of henna at health food shops are around £8 each and I would still need 3 of them!]
I have fairly thick not-quite-waist length dreadlocks and 4 squares of one block was sufficient to cover my dreadlocks.
OK, rambling done here is my step by step on how to henna hair.
--------------------------------------------------------------------------------------------------
You will need
to do a strand test, I didn't but then again, I am an idiot.
1-2 squares of lush henna for short dreadlocks [3 inches - jawline]
2-3 squares for medium dreadlocks [jawline- shoulder length]
3-4 squares for long dreadlocks [shoulder length and longer, I used 4 1/2]
5-6 squares for extremely long/thick dreadlocks
[think Bob Marley thick or bum length although if you DO have this type of length I would recommend you buy two blocks to be on the safe side.]
1 pan
1 whisk
paper towels to put your block onto while cutting
1 grater [not necessary and is hard work but makes the mixing job easier]
1 Bain-Marie [ I used a bigger pan for mine but you can use whatever you want.]
Old towels
Old clothes
CLEAN hair, mine was greasy therefore I think the dye did not take
Rubber gloves [if Lush didn't give you any]
------------------------------------------------------------------------------------------------
Obligatory before picture
Right, this what your block will look like you will want to either get it cut up in store or cut them yourself
Next up you will want to grate however many squares you need, this is not necessary and is very hard work [ideally get your husband to do this] but believe me, it will mix so much better and there will not be any bits when you put it on your hair
When you've grated you want to boil some water in the kettle. Now this bit is a bit tricky because I have no idea how much you should use as it really is trial and error.
Lush say to add enough water to be able to mix it so it is as thick as double cream, I used 400mls [some girl on a forum said she used a cup and I used a cup and a bit!], far too much water and had to add another square-and-a-bit to thicken it but that was more like whipped cream!
So add 100mls at a time to be safe. After you've done, you want to whisk it.

When you've mixed it to double cream, make your Bain-Marie and boil it on a high heat.
When you see bubbles starting to rise, turn the heat right down and put your henna in the Bain-Marie. If you leave it on a high heat, the excess henna around the pan burns. While it's heating in the Bain-Marie make sure to constantly mix it.
Now here is the part where you want to get your gloves on. As the Bain-Marie heats the henna you need to keep dipping your finger in to test that the henna does not get too hot for your head.
As soon it gets slightly too hot but not unbearably so, you want to take the henna out of the Bain-Marie
If it is too hot for your scalp leave it to cool but don't let it get cold.
Next you want to lay down old towels where you are doing the job and slap the henna on to your dreadlocks and scalp making sure that all your hair is completely covered in henna.
And then you wait...
Lush say to leave it on for four hours, but in mine and many other's opinions, this is not long enough.
I left this in my hair for 6 hours, I did want to leave it on for eight hours but excitement got the better of me. I did not cling film my hair up.
You want to rinse, rinse, RINSE until the water runs clear then lightly shampoo it.
I envisaged beautiful healthy brown hair. The result was slightly disappointing:
I mean, it looked healthy and got rid of my patchy bits but it wasn't as dark as I hoped it would be.
I think strongly the reason my hair didn't take was because it was greasy as hell, I did not have time to wash it.
It did give my hair a lovely shine though.
It's been a week now and there is virtually no sign that I dyed my hair... Apparently the more you use it the more it will develop.
So I dyed it again but just my roots, last night ,as I'd washed my hair the day before.
After doing loads of research during the week, I decided to add a teaspoon of coffee and half a lemon per square [I used the one and a half squares I had from the first block ].
I also cling filmed my hair and slept with it in my hair for 11 hours.
I also did not let it get so hot that it was steaming like I did last time, I just very gently warmed it through.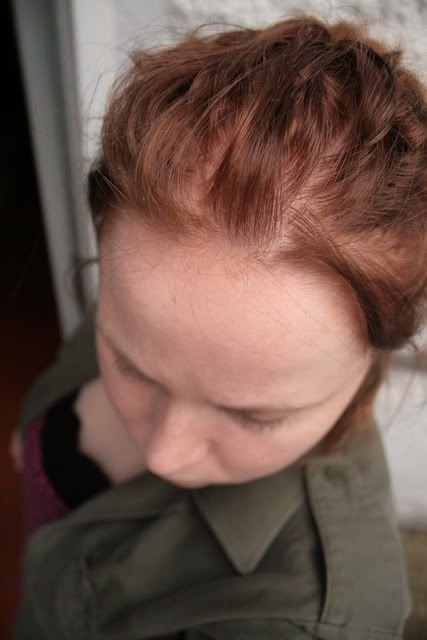
The results of this where much better and suited my skin tone far better.
I love the reddish tones so much, as soon as I get more lemons I'm going to do the rest of my hair as you can see that there is no more henna in my dreadlocks: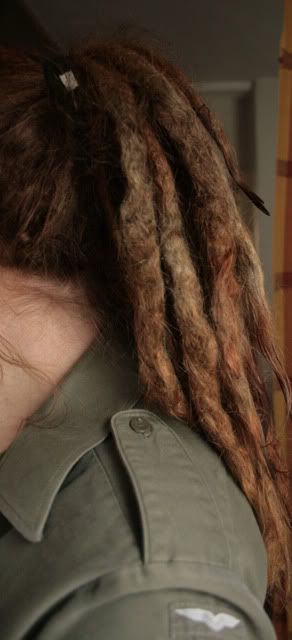
There is an awful lot of work to do when hennaing your hair, but if your hair is superbly damaged then it is worth it. Especially at the price it is. If you want red tones then wrap your hair in clingfilm. I find that it prevents the henna drying and stays moist, presumably moistness helps the colour develop. I am definitely a Lush Henna convert after the second try!


0 comments:
Post a Comment